Friday, August 31, 2012

Time to Create!


Quiet time...we all need more of it! 
So why not create it??

I am finally giving myself the time
...to create
...for personal wellness 
...and much needed quiet time.


So I am off to design and create 
with the much needed no pressure.
photos to come later!

I will be back Friday October 12th!

 until then, I thank you for your support!
xoxoxox
Leslie


Friday, August 24, 2012

Wedding...things for Julia

Our family has two wedding this September! One is my nephew Elias to marrying his bride to be
陳淑孟 (Joyce) from Taiwan...and the wedding will be September 15th, held in Taiwan...more to come on that wedding in a later blog.

The other is my niece Julia marrying Gareth (from Ireland). They had their wedding in Ireland last summer and now are having their US ceremony here on September 1.
July 2011
SOoo..in has become a tradition, in most cases, that I create the veil and the garter for my neice's / nephew's weddings.
Julia's dress is most interesting being that is it made from tyvek...you know like those white mailing envelopes!?!

It is a beautifully made dress that she purchased last summer in Dublin...
July 2011
So it came to me to create a veil for her. I consider Julia my boho niece, very creative and always stepping outside the box. Her dress is a simple silhouette...pieced together...


This dress could handle something different than a traditional style of veil...so I thought head piece!...something in a flapper styling...I gathered my materials of tea bags, tyvek to recycle, and purchased handmade Japanese papers purchased from Kozo.
l to r: tissue thin Japanese paper, Hand applied threads in Japanese paper, tyvek, tea bags- that I later bleached.
 I thought about the design and Julia and I emailed to discuss this creation. I could be a bit more three dimensional because of the simplicity of her dress. I hand made each flower and leaf using a Japanese technique to create movement, softness and texture in the paper.
I used a pencil for my wrapping and scrunching technique! See how lovely the petal form the tea bag turns out!

Here is the end result...I will get more photos of her actually wearing the headpiece at her wedding!
I created a sturdy headband base of satin and added looped ribbons to each end. Next added petals on each end and made rose buds to start the graduation of the flower size. Made and added all the larger flowers. Filled in with individual petals, feathers, pearls, and thin satin loops.
close up
end shot of looped ribbon and rose buds surrounded by petals.
oh yes- the garter - you ask?? 
Well it has a quirky little surprise to be revealed at the wedding...

Will keep you posted on the weddings!
Now...back to making my dolls for the NIADA Conference!!!


Friday, August 17, 2012

Super Husband...

Will return next week
with a fixed computer…
Thanks to my
handy super husband, Mark!

Friday, August 10, 2012

Simone ~ Doll 6

SOoo... I was going to write about the wedding dress and creating a bustle...and the wonderful thing about writing your own blog you can change on an inspiration!

Simone...the 11 year old girl who comes to me every Wednesday morning to learn and create dolls. We have created 6 dolls together...so far...
During this recent project Phoebe...I asked Simone if she would like to vary of of dolls for our next project. Her reply was no, she wanted to stay focused on dolls to become a very good dollmaker. YES! girl after my own heart!

Project

So, Phoebe was the project she picked out...

Inspiration

We discussed changes she would like to make to Phone and one thing she wanted was to change to face to be more of a Japanese anime style...so we looked up features of anime of the Internet to get an idea.
Next was the costuming...we landed on the Mori Girl look... I personally LOVE this look!

Mori Girl
Mori in Japanese means "forest" and a Mori Girl (森ガール) is a girl who looks like she lives amongst cedar and pine trees. She's part Little Red Ridinghood (although she prefers  blue,green or brown to bright red), part Marie Antoinette pastoral fantasy, part Alice in Wonderland.

So armed and ready, over the next weeks we created...sewing the body...painting  the face...drawing out quick sketches to alter the costuming!

The Doll

Body changes are: Face style
Costuming: A line dress with cap sleeve and bottoned straps, 
bloomers with ruffles, boots, lace

Here are close ups...
Face close up- free drawn and hand painted by Simone

Adding a bit of vintage lace at the bottom of the dress
 
Used metallic sequin black paint to add sparkle to the boots- can you see it??

It was a very fun project to do together... I can't wait to start our next project- Meow Meow Neko.

It will be an adventure to see where this talented young lady will go!
 

Friday, August 3, 2012

Your Creative Path

 One of the advantages of being a member of NIADA is that we, as artist, have access to editor Barbara Campbell. I have known Barbara, well, I think pretty close to when I began this whole journey into dollmaking! She spurred me on to write an article for Doll Collector (formerly Contemporary Doll)...
Speak from the heart...

So, I sat pondering what to write about...technique...no...gallery pieces...no...What do I LOVE??? BINK....my students...teaching...BINK
The idea starting rolling around in my head....ok...so I have been doing this full time for 20 years...What can I tell you about that?? What lessons have I learned??? Lessons! How can I guide you in my lessons that I have learned??? And the idea came to fruition. HA! perfect word for this:

fru·i·tion  [froo-ish-uhn] noun


1.attainment of anything desired; realization; accomplishment: After years of hard work she finally brought her idea to full fruition.
2.enjoyment, as of something attained or realized.
So I quickly wrote on paper what where some of the Lessons I had trialed through in the course of my career as an artist. I can give you the list of Lessons (for now)...but for the deep info...the magazine* is where to find the rest!
*I believe Barnes & Noble carries it.

And my thoughts took me back to when I started...20 years ago, and yes, I did have a defining moment that brought me to dollmaking- more specifically after a great trauma... my dear husband, Mark, asked and I said I wanted to be an artist and work in fiber...

My hope is these lessons learned will help you in 
Finding Your Creative Path...

 Lesson 1: Know when to fold 'em.
Lesson 2: Just do it!
Lesson 3: Be brave but not too serious!
Lesson 4: Find your market.
Lesson 5: Jump in!
Lesson 6: Stay true and be Teflon.
Lesson 7: Keep learning and give yourself time.
Lesson 8: Step out of your comfort zone.
Lesson 9: Keep a fresh eye.
Lesson 10: Be grateful and walk in sunshine.

In the beginning...
My first doll I made as a "professional" doll artist
re-cycled wool with button eyes...vintage pearls!
 Here are some of the photos I submitted for this article: 
very first series of little wool rag dolls- 1992- remember this WAS 20 years ago!!
3 of my first doll patterns from 1992-ish
  
AND today after 20 years...some of my one-of-a-kind pieces.
Lotus from the Story Doll Series- held in a private collection
Close up of Lotus

Swan Lake from the StoryBook Series- all jointed- held in a private collection
Close up of Swan Lake- Crepe silk with hand-painted eyes
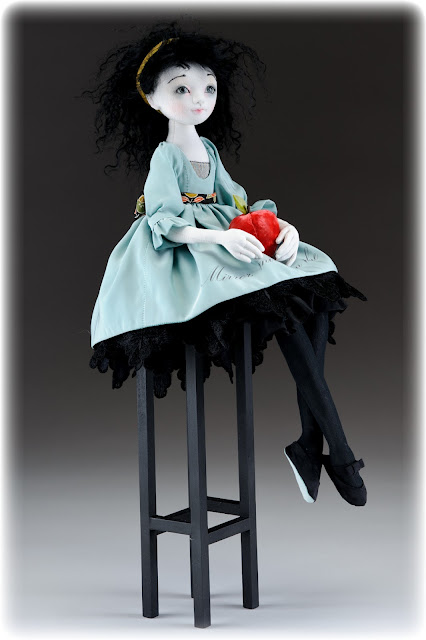
Snow- from the StoryBook Series- all jointed- held in a private collection
Snow close up- silk crepe hand painted eyes
photos:Leslie Molen, Robert Batey, Mark Mortensen
And this all brings us back to

fru·i·tion  [froo-ish-uhn] noun


1.attainment of anything desired; realization; accomplishment: After years of hard work she finally brought her idea to full fruition!!
2.enjoyment, as of something attained or realized.
...and I am still learning! 


Next week- 

Things I am doing for our

 Nephew's wedding in Taiwan.


Related Posts Plugin for WordPress, Blogger...